My Final Sculpture Process

For my final piece, I worked to combine all of my areas of study into one composite sculpture. I decided to have a piece which focused on the Green Man, as, from my research, I believe this archetype is the best artistic representation of humanity’s relationship with nature. I also wanted to use the selection of collected pottery and sea glass fragments as they, to me, perfectly represent human kinds influence on the natural world and demonstrate how the two compliment each other. I felt a mosaic would be the best way to display these pieces, as it is similar to the Andy Goldsworthy-esque patterns I created previously in my project, except with more permanence.

I now began to sketch ideas of how these two elements could be combined, playing around with the ideas of the mosaic pattern creating a Green Man, to a clay Green Man with texture added by pieces of the pottery. I finally settled on the idea of a mosaic base, with clay branches cracking it open and growing through the pottery, much like a weed might grow through concrete, before forming into a central Green Man figure. Now that I was happy with my rough piece idea, I moved onto sketching Green Man designs which I could sculpt from air-dry clay.

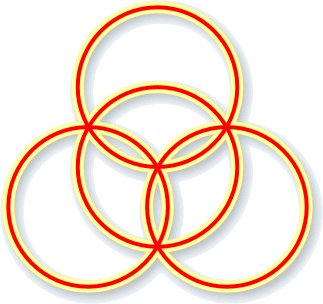
On the technical side of the project, I also planned out the structural options for the base of the work. Initially, I simply planned to use a wooden board onto which I could mount my mosaic and clay Green Man. However, I also realised that if I was using sea glass, a transparent material, I would like the fully represent it, perhaps by shining light through the glass from beneath. If the glass was mounted onto wood, it would take in the colour of the base or clay beneath it, potentially affecting the impact of the colours. I experimented with the idea of cutting holes in my wooden base and covering them with a sheet of perspex or glass so that light could shine through, but finally settled on a circular base design. For this, I took three perspex circles and bonded them together with a log slice in the centre. I later also added another log beneath the piece in a sandwich formation, which raised the sculpture slightly, allowing the light to get through. I used ‘Gorilla Glue’ to bond the pieces, as this strong adhesive expands as it dries, safely securing the inevitable gaps between the components where the wood warps.
Circles
A digital rendering of the base structure

I sketched the rough sculpture design onto wood so that I could plan where the branches would grow from, as well as the outline of the face.

IMG_7776

I sculpted the branches first from air-dry clay, however, this later proved to be a challenging material. Firstly, in order to ensure the clay was properly secured to its base, I had to smooth the edges into the wood, which concealed much of the natural grain.

Also, as the piece dried, it cracked severely all along the work. I realised that this was due to the gradually thinning shape of the branches, as clay shrinks as it dries, and the smaller ends dried more quickly than the thicker tops. This change in consistency affected the integrity of the whole structure, causing it to split along the fault lines.

I tried to repair these damages with more clay, spraying the inside of a plastic bag with water and placing it over the sculpture, a technique which I read about whilst researching my issue. As the clay dries, it gradually takes in the moisture from the air of its environment, hopefully causing a more even drying and therefore no cracking. Unfortunately, to get the correct shape of the clay, I had to use large amounts of water to create a smoother consistency. Because there was so much water to evaporate before the clay could be fully dried, no matter how damp the air, the clay still cracked.

I now decided to try another method. I pulled and scraped up the remaining clay, glued a fresh new piece of wood onto my sculpture, and re-tried my branches with ‘Fimo’, a brand of polymer clay, which is oven-baked to harden.
IMG_7918

I formed the shapes of the branches, adding small liens to the clay and on the wood so I could more easily line them up when baked. I also number corresponded each section to a clay branch to avoid later confusion.

To bake these pieces in their correct shapes, I balanced them on small blocks when I placed them in the oven so that one end would dry elevated. They were fired at 110°c for 15 minutes; this is slightly less than the recommended time, as I wanted the piece to have some slight flexibility to aid in the mounting.

IMG_7928

I corresponded each piece to its number, then used a hot glue gun to bind the clay to the base. Due to the clays slight shrinking, as it was fired, several of the pieces had changed shape slightly. I found, however, that by snapping the branches at their hinges, I could get them flush with the base and use the hot glue to fill in the gaps. As this glue is fast drying, it can take on a putty-like consistency which I found can be moulded slightly to create a rounded shape, allowing for a uniform shape to the branch.

These modifications were then covered over with a small amount of air-dry clay so that further texturing and paint could be added more easily later on in the process.

Now I moved my attention to to the kosaic that I intended to create on the Perspex circles. I first selected the pieces of sea glass that I wanted to use, placing them spaced out evenly across the space. They were secured with hot glue, as the irregular shapes of the pieces meant that they would not lie lerwfectlu fkag, and the hot glue was good to mild to their unique shapes. It also dries quickly, allowing me to ensure that I could continue working without fear of knocking anything out of position. Once they were placed, I continued the mosaic by fitting in the sections of pottery into the gaps. I placed everything first to make sure I had the best layout and that I was happy with the design, before going through and methodically glueing each piece down. Due to the smooth, I textured nature oh elms of the pieces, the glue wasn’t as secure and had to be further stick with the aid of super glue.

Andy Goldsworthy and Mosaic Work

Andy Goldsworthy OBE is a British sculptor and photographer who works from Scotland. As a conservationist, a lot of his work looks at the human impact on the natural world, creating site-specific works form natural resources.

The work of Andy Goldsworthy is something that I have admired for a long time, since going to see an exhibit of his art at the Yorkshire Sculpture Gallery when I was a child. As a little girl, his books Wood (1994), Stone (1996) and Wall (2000) fascinated me, and I spent hours looking over the pictures even before I could really read about what the work meant. The idea of blending the natural world and art was a novel idea to me, and Goldsworthy’s aesthetically appealing colours and seamless blends of natural formation and placed patterns set my imagination wild. This idea of taking the world around you and creating beauty, without the need for it to damage or affect the environment is a core ideal which I would love to try and convey in my final piece.

Eager to experiment with this style and some of its ideas, I decided I would love to create some pattern works with pieces of broken pottery from the fields surrounding my home, as well as sea glass from the banks of the river Severne.

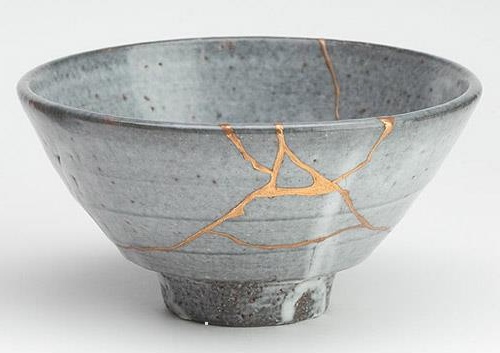
Pieces of broken pottery are, to me, a perfect example of human history blending with the natural world. Most of the pieces are either willow-pattern china or terracotta earthenware pieces, remnants of old vases or sups, mostly from the Victorian era. These pieces are leftover from where people’s belongings chipped or cracked are were thrown out, eventually winding up in the dirt amongst the stones, and lifted out again when a field is ploughed. They are a small but significant of history, and I find the possibilities of stories behind each one enigmatic and inspiring. I placed them onto a white board, fitting them together haphazardly like an odd puzzle, creating something new form the pieces of many broken things and forming new art, which is reminiscent of the old Chinese artform of Kintsugi. kintsugi

I also experimented with so-called ‘sea glass’. These are pieces of broken glass which end up in the sea or river and are eroded at the edges over the years by the tide, creating misty and smooth-edged pebbles of glass. They are used by many to create jewellery and have become an almost kind of gem as they are not possible to be man-made and have to be found naturally. It took me many trips to various beaches and shorelines to gather all of the sea glass I have. Again, I find this an incredibly compelling blending of humanity and the natural world, as a man-made substance is released back into the world to create something new.

I first placed the glass on my board in colour coordination, ranging from clear through to brown, then created some concentric circles like many of Goldsworthy’s pieces. I then made an A2 sized work where the glass went in size order, from sections as large as my hand to minuscule chips of glass.

I loved the overall effect of this, the only issue being the permanence of the work. I liked how it looked against the white backdrop, however, there is no way to secure the pieces to the board easily, so I could only photograph them and then disassemble them. This would be impractical going forward, as a final piece needs to be more mobile than this. I would love to explore this mosaic theme more in my end work but perhaps will have to look at clay or mortar as a way of securing them together.

The Green Man

‘The Green Man signifies irrepressible life…In all his appearances he is an image of renewal and rebirth, and his reappearance today in art and as a symbol of environmental movements is of the profoundness significance for humanity’ – Green Man, The Archetype of our Oneness with the Earth by William Anderson

For me, I wanted to explore the symbolic Green Man in my art as I feel it is the definition of humanity’s relationship with the natural world. The figure has emerged in cultures throughout history, and its origins are unknown, which adds to its feeling of history and timelessness, much like nature itself. Many believe that the symbol has pagan origins, however, it can also be found in medieval Christian churches and cathedrals across Europe. The name ‘Green Man’ was not given to the figure archetype until 1939 by Julia, Lady Raglan in her article The Green Man in Church Architecture in The Folklore Journal. There are generally considered to be three types of Green Man, the first and oldest being a male head formed out of a single or many leaves. The second form is a male head disgorging vegetation, often form the eyes and mouth; the vegetation may also form hair, a beard, eyebrows, or a moustache. The third form shows a head which is formed out of the fruit or flower of vegetation.

‘The Green Man as a composite of leaves and a man’s head, symbolizes the union of humanity and the vegetable world. He knows and utters the secret laws of Nature. When an image of great power such as the Green Man returns as he does now in a new aspect after a long absence, the purpose of it’s return is not only to revive forgotten memories but to present fresh truths and emotions necessary to fulfilling potentialities of the future.’

The Green Man in history appears time and time again, fading from society, often for hundred’s of year, before the idea re-emerges. Like the natural world, it is ever present, re-sprouting vastly unchanged despite years of dormancy. To me, this is greatly symbolic of nature; whilst we as a society are constantly changing and evolving, the natural world is always there in the background, with change happening slowly, and plants growing the same way for hundreds of years. The only dramatic changes that can be found in the natural world have occurred because of human influence or interference. This consistency is to me comforting and of great inspiration; like art, nature will always be present no matter what challenges and struggles we face in society, and will always appear time and time again. From the ancient cave paintings in Indonesia to modern art installations, human creativity has always found a voice, even in the greatest of hardships. From trees to tiny sprouts, natural life flourishes regardless of setting, pushing up through concrete to grow. This is the idea that I wanted in my work, a feeling of the endurance of nature.


Exploring the Work of Cai-Guo Qiang

Cai Guo-Qiang is a Chinese born artist who creates mass-scale pieces from gunpowder. His work creates abstract shapes and formations, as he makes the pieces by depositing gunpowder on a canvas and setting it alight. This means that the final result can never be pre-determined, making each piece unique and unpredictable. This idea of having the natural forces determine the outcome of your artwork intrigues me, as it is a perfect example of the natural world and humanity coming together to create beauty. To research this artist and his work, I watched the documentary ‘Sky Ladder: Th Art of Cai Guo-Qiang’, which explored the methods of his art, as well as his personal journey with the work and the meaning behind it.

For my own interpretation of this, I took the idea of letting the powder create artwork for you by dropping powder pigments onto the page. The pigments I used were made from mica, the coloured strain which can be seen in rock. I first painted the page with a water and glue paste, before using a scoop tool to take amounts of the powder and dropping it onto the paper from varying heights. I found this technique freeing, as I am used to having absolute control of my work via a pencil or paintbrush, so to take a back-seat and let the natural laws create my work for me was a new experience. It reminded me of our world, and how the forces of nature decide everything; the shape of the land, whether by water eroding rock or tectonic plates creating mountains, the growth of plants, whether a forest or a field. It reminded me that we as a society are simply living on this earth and it does not belong to us, a feeling that I would like to try and replicate in more of my work.

Final Major Project – Initial Response

I was told in our initial project briefing that, as this project was going to be spanning over nine weeks, the longest of any of our modules, it should be based on something which we could find compelling and interesting continuously for over 2 months. In my initial brainstorm, I wrote down some simple key-phrases that I thought I could work from:

  • Humanity
  • Natural World
  • Creation
  • Identity
  • Expression

I then did a brief search on the internet for these phrases, curating a selection of images of artworks that I found interesting and inspiring. From these, I then began bouncing around ideas for my own project, and found that the theme that I kept coming back to in the works that I found most compelling was the natural world, and, more specifically, humanity’s relationship with it. As someone who was born and grew up on a farm in the countryside, I have always found nature to be a great inspiration to my work, and decided that this would be a good base from which to grow my project.

! Life Drawing Workshop

Our workshop today was a life drawing class, where we used charcoal to draw a still-life model. We first completed several 5-minute drawings to grasp the initial idea of the work; my first image I completed with pencil, as I am more comfortable with this and wanted to get into the feel of it before moving on to the more difficult medium of charcoal. I find charcoal more difficult to use, especially when moving quickly, as the lines are less defined and easier to smudge, which is problematic for me as my art style much more expressive, often resulting in lines becoming blurred and messy.

For my second quick drawing, I tried to make my work larger and include more fluidity.

After this, we moved on to blind drawings. Our life model changed positions, and we worked by looking only at her and not moving our eyes to our canvas. This technique always creates very interesting pieces, showing you how your subconscious judges space when it cannot actually see it. We did this three times; for my third attempt, I tried to make my work a continuous line drawing, where the charcoal is not removed from the page, to see whether this would make my work more realistic. I found that whilst this did mean three were more details to the figure, I actually preferred the first blind drawings, as the fluidity creates more of a realistic representation of the human figure.

Our next technique was a negative space drawing, where our charcoal markings were the shadows around the figure, letting the person emerge slowly. Our model sat for this drawing, meaning we also had to compete with the chair in our work. For me, when the initial figure had been drawn, I also went on to draw some of the shadows within the figure, creating a more three-dimensional shape.

Finally, we spent 25 minutes on a final drawing, incorporating what we had learned throughout the class; drawing lines and circles on the page to correctly set out the proportions, the importance of negative space and shading, the background features of the room to add context to the piece, and also continuously looking to the model instead of filling in what we thought the figure should look like. To create the most accurate piece, it should be 10% looking at the canvas, 90% looking at the subject. Overall, I was pleased with my final drawing; I had a difficult perspective of the model where my easel was positioned, and I found it difficult to get the correct proportions of the legs, as they were upon a footstool in front of the model, several times resulting in my drawing representing te=hem as too short. I was happy with the shading of my work at the end, as I felt it was the best of my abilities in the time given.

I enjoyed this workshop, as one of my artistic weaknesses is creating more photo-realistic, perfectionist artwork, and this class simply encouraged drawing; even if it wasn’t perfect. I find this style of working good, as it improves my technique with little pressure, focusing simply on the basic foundations of human proportions.

Inside Out – Initial Response

In my previous projects, I took the brief and looked at the meaning from a different perspective, creating artwork exploring the human physique. With the brief, I would like to explore the literal meaning, looking at humans from an anatomical, scientific perspective. An area of art I feel I have not experimented with enough is abstract artwork.I feel I can combine these two ideas, using red paints to create abstract looks at the human’s body, allowing people’s perceptions of what the inside of a person should be to create subjective works which hint at the theme.

The first artist I lean towards with this is Maggie Ayers, who uses textures to create which leave much of the interpretations of the meaning behind the art to the imagination of the viewer. I love the expressive techniques Ayer uses, layering fabrics and paints to form semi-three dimensional pieces, where the more in-depth the canvas is viewed, the more details are revealed

.

My Final Sculpture Process

For my final pice, I decided to create a 3 dimensional work, combining some of the ideas brought forth by the artist I have researched throughout the project. The idea of OCD and mental health was what I wanted to create my work around, including some of the more ‘macabre’ elements presented by Shawn Coss and John Kenn. The idea of Toby Allen’s ‘Monster’ series particularly interested me, and I liked the idea of turning the non-corporeal abstract idea of mental health, into a physical being. I thus decided to create an eery sculpture to depict Obsessive Compulsive Diroder. The frame was design loosely off of the human anatomy, but dis-proportioned and hunched, as I envisioned it sitting on a shoulder, whispering in the ear of the victim, much as mental illness tells lies to people and distorts the world. The fabric of the piece is sewn roughly, and this was inspired by Frankenstein’s Monster; sections of skin lashed together to create a fragile yet monstrous creature. The hands were given long, skeletal fingers as I imagined it digging its grip tight to a person as mental illness does, and the hands and feet were roughly painted black, the taint of the evil spreading form it and into the victim at its points of contact. The head was design around a birds skull, with beak and empty, hollow eyes to show an uncompassionate, thoughtless beast.

For me, this work is truly unsettling, and with it I aim to invoke a similar response from those who see it, hopefully highlighting the un-romanticized version of mental illness; showing it how it truly is.


Stage One

In order to create this figurine, I first made an armature from pliable aluminum wire, as it was easier to sculpt and made a good base layer to determine the proportions which I could then build from. The wire forming the torso of the sculpture is about 30cm long. To help increase the structural integrity, I used one continuous piece of wire folded back on itself, as, if i used multiple wire pieces, the joins would create weak points and increase the chance of the sculpture falling. The electrical tape was wrapped around certain sections of the model to keep the folded back wire in place, and to increase strength around the sections where there would be bends. I then molded the armature into my desired pose by taking pictures of a human model in the same positions, ensuring the angles were correct. I also applied two wing sections which I can build up later. Wrapping strips of felt around the armature meant that the sculpture has more structural integrity, keeping it form buckling under the weight of the next stages.


Stage Two

Next, I formed the bulk of the form by putting polyester wodding on to the frame and securing it by wrapping wool and twine strands around it. Where the anatomy needed to be thinner, I wrapped the twine more tightly, and wrapped it more loosely for the bulkier sections. The colour and neatness of the twine and wodding were not important at this point, as I would cover all of the framework in the next steps, so it would not be visible. This is also why I only needed to make the vague shapes of the form, rather than being perfectly anatomically correct in great detail. I found this particularly interesting to sculpt as, due to it being a mythical creature of my own design, it did not have to 100% accurately portray the anatomy of a human figure, and this is interesting to play around with creatively. To take the photographs for this stage, I found that I needed to tie some thread around the model in order top hold it up; in all of the images, the position alters of the sculpture alters slightly, and this is because I had to adjust the shape with every layer, as there was more weight added and thus the balance kept altering. When the wodding was added here, I found that the pliable aluminum wire could not support the sculpture’s weight. The thread was purely for photography purposes, but a more durable solution would be will be found later in the process. After this, the wodding was covered with strips of muslin cloth to secure it and keep it all in. I also tightened and loosened the wrapping to help form the shape, as well as using strips of varying widths ands lengths. I created a harness out of embroidery thread to replace the makeshift cotton thread from before, in order to hold up the sculpture.


Create a free website or blog at WordPress.com.

Up ↑